
Side Dishes
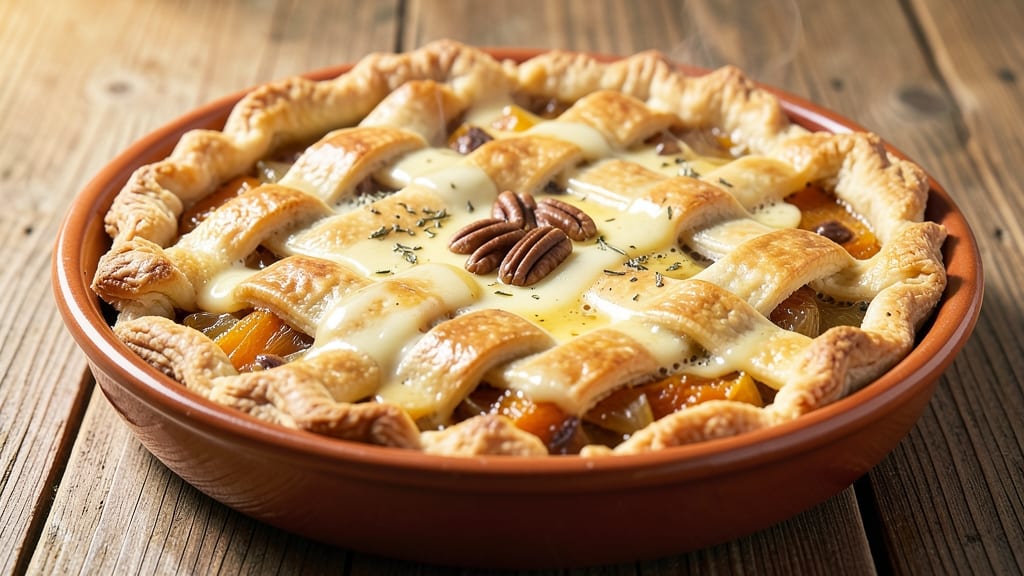
This squash pot pie recipe delivers the comforting embrace of a homemade classic with a flaky crust that practically melts in your mouth. 💛 The secret lies in balancing tender butternut squash with savory herbs and a rich, velvety cream sauce—all baked until golden perfection.
I developed this version after years of testing, ensuring every bite delivers that perfect harmony of textures and flavors.
The beauty of this recipe is its versatility—whether you use traditional puff pastry for that signature flakiness or a gluten-free crust for dietary needs, the result is the same: a restaurant-worthy dish that feels like a warm hug on a chilly evening.
The filling cooks through in just 45 minutes, making it ideal for weeknight dinners or holiday gatherings where you want to impress without stress.
What sets this apart is the way the squash caramelizes slightly at the edges while staying creamy inside, all encased in a crisp, golden crust that holds up beautifully when sliced.
The aroma alone will have everyone gathering around your table, and the first bite will confirm why this is a dish worth making from scratch.
Serve with a simple green salad or crusty bread to soak up every last drop of that savory filling. The best part? Leftovers reheat beautifully, making this the ultimate make-ahead comfort food. Let's get started!
Ingredients for squash pot pie
This cozy pot pie brings together velvety squash filling and a golden, flaky crust—just like grandma used to make.
| Ingredient | Amount | Notes |
|---|---|---|
| Butternut Squash 🎃 | 2 ½ lb | Peeled, cubed, about 4 cups |
| Unsalted Butter 🧈 | ½ cup | Cold, cut into pieces |
| Yellow Onion 🧅 | 1 whole | Diced, medium size |
| Garlic Cloves 🧄 | 3 cloves | Minced, fresh preferred |
| Heavy Cream 🥛 | ¾ cup | Full-fat for richness |
| Chicken Broth 💧 | 1 ½ cups | Low-sodium preferred |
| All-Purpose Flour 🌾 | ¼ cup | For thickening sauce |
| Fresh Thyme Leaves 🌿 | 1 tbsp | Chopped, or 1 tsp dried |
| Fresh Sage Leaves 🌿 | 1 tbsp | Chopped, or 1 tsp dried |
| Salt 🧂 | 1 tsp | Kosher or sea salt |
| Black Pepper 🌶️ | ½ tsp | Freshly ground preferred |
| Puff Pastry 🥧 | 1 sheet | Thawed if frozen |
| Egg 🥚 | 1 whole | For egg wash |
The butternut squash is the star here—look for one that's firm and heavy for its size. Costco often has great prices, but any grocery store with a produce section will have what you need. If you're short on time, pre-cut squash from the salad bar works too, just rinse it well. The key is roasting it until tender but not mushy—about 25 minutes at 400°F. For extra flavor, don't peel the skin completely; leave a little for color and nutrients. The onions should be sweet, not bitter, so yellow or white work best here. If you're using dried herbs, measure them out before adding to the filling—they're potent stuff!
No heavy cream? Half-and-half or coconut cream will work, though the texture will be slightly lighter. Fresh herbs make all the difference—if you're using dried, reduce the amount by one-third. The puff pastry is non-negotiable for that signature flakiness, but gluten-free puff pastry works beautifully if needed. For a shortcut, store-bought pie crust can substitute, though it won't be as impressive. The chicken broth should be low-sodium; if yours isn't, rinse the can before measuring. And trust me on the butter—full-fat is worth it for that rich, velvety sauce. If you're making this ahead, assemble the pie and refrigerate it overnight for even better flavor development.
This pie reheats like a dream—just pop it in the oven at 375°F for 20-25 minutes until the crust is golden again. Store leftovers covered in the fridge for 4-5 days, or freeze portions for up to 3 months. The filling actually tastes better the next day as the flavors meld together. For serving, a simple arugula salad with lemon vinaigrette cuts through the richness perfectly. And if you're feeling fancy, whipped cream on top adds that final touch of indulgence. The crust gets crispy as it cools, so let it sit for 10 minutes before slicing—patience pays off here!
Why You'll Love This Recipe
- One-Pan Magic: I swear by this recipe when I’m too tired to wash dishes. The squash roasts right alongside the onions in that same pan—no extra pots, no fuss. Just butter, garlic, and 20 minutes of hands-off time while the heavy cream works its velvety magic.
- Creamy-Garlicky Bliss: That first bite? The butternut squash melts into the rich cream while the garlic cloves caramelize just enough to make your whole kitchen smell like a hug. Honestly, I’ve made pot pies before, but this one’s the only one that actually makes me groan with happiness.
- Weeknight Workhorse: Between us, this is the dish that saved my sanity during grad school. It reheats like a dream for lunches, feeds a crowd without stress, and even my picky roommate (who hates veggies) asked for seconds. Add a side salad or crusty bread, and you’ve got dinner covered.
- Budget-Friendly Luxury: You’d think heavy cream and butter would make this splurge-worthy, but butternut squash stretches far—and the flavor’s so satisfying, you won’t miss the fancy ingredients. I’ve made this for $15 and still felt like I’d ordered takeout. (Yes, even on a Tuesday night.)
Step-by-step instructions for squash pot pie with flaky crust
Here's how to create a showstopping pie where tender squash meets a golden, buttery crust.
🍳 Step 1: Roast the Butternut Squash Until Caramelized
Preheat your oven to 400°F. Toss the 2.5 lb peeled and cubed butternut squash with 1 tablespoon olive oil (not listed but essential for roasting), ½ teaspoon salt, and ¼ teaspoon black pepper. Spread on a baking sheet in a single layer—crowding steams instead of browning.
Roast for 25-30 minutes until the edges are deep golden brown and the squash yields slightly when pressed. You'll see caramelization at the edges—that's your cue it's ready. Real talk: if it's not brown, it won't have that sweet depth in your filling. Transfer to a bowl and set aside.
👨🍳 Step 2: Build the Savory Filling with Aromatics
In a large skillet, melt 0.5 cup cold unsalted butter over medium heat. Add the 1 whole diced yellow onion and cook for 5-6 minutes until soft and translucent. Here's the thing—don't rush this. You want the onions to break down completely before adding anything else.
Stir in the 3 minced garlic cloves and cook for 30 seconds until fragrant. Add the roasted squash, 1.5 cups chicken broth, 1 tbsp chopped fresh thyme, and 1 tbsp chopped fresh sage. Bring to a gentle simmer, then reduce heat to low and let it cook for 10 minutes until the flavors meld.
🥘 Step 3: Thicken the Filling with Cream and Flour
In a small bowl, whisk together 0.75 cup heavy cream and 0.25 cup all-purpose flour until smooth. This creates a roux that will thicken your filling beautifully. Pour this mixture into the squash and stir gently—you don't want to break up the squash pieces.
Simmer for another 5-7 minutes until the filling thickens enough to coat the back of a spoon. Taste and adjust seasoning with more salt or black pepper if needed. The filling should be creamy but not soupy—it should coat the squash pieces lightly. Transfer to a 9-inch pie dish and smooth the top.
🔥 Step 4: Assemble and Bake the Pot Pie
Roll out the 1 sheet puff pastry on a lightly floured surface until it's about 1/8-inch thick. Cut a circle slightly larger than your pie dish to cover the filling completely. Here's the trick: brush the edges of the puff pastry with the 1 whole egg beaten with a splash of water, then fold the overhang inward to create a decorative edge.
Bake at 375°F for 30-35 minutes until the pastry is deep golden brown and puffed. The center should be hot to the touch but not burnt. If the edges brown too quickly, tent with foil. Let it cool for 10 minutes before slicing—this prevents the filling from spilling out.
🍽️ Step 5: Serve Warm with Crispy Crust
Slice into wedges and serve immediately while the crust is still crisp. The contrast between the tender squash filling and the flaky, golden pastry is what makes this pie unforgettable. I like to pair it with a simple green salad and crusty bread to soak up any extra filling.
Pro tip: If you can't serve it right away, cover loosely with foil to keep the crust from getting soggy. Each bite should deliver that perfect harmony of sweet squash, savory herbs, and buttery pastry—worth every minute of effort!
Pro Tips For Making Squash Pot Pie
- SWEAT THE ONIONS FIRST: Don’t rush the onions—get them golden brown and jammy before adding garlic. I used to skip this, and the whole filling tasted flat. Five minutes of low heat with a splash of water if they stick makes a real difference.
- ROAST SQUASH UNTIL SOFT: Cut the butternut squash into ½-inch cubes and roast them at 400°F (200°C) for 25-30 minutes until fork-tender. Overcooking turns them to mush, but undercooking means you’ll taste raw starch. Test with a knife—it should slide in like butter.
- SALT THE CREAM: Season the heavy cream with a pinch of salt before adding it to the pot. You’re using unsalted butter, so the cream needs its own flavor boost. Trust me, the difference is noticeable—no one wants bland filling.
- SKIP THE BOILING CREAM: Warm the heavy cream gently over low heat until steaming, but don’t let it boil. Boiling makes it split, and you’ll end up with a lumpy, curdled mess. A quick 2-3 minutes is all it takes—just enough to marry the flavors.
Common mistakes when making this dish
Overcooking the Squash
One of the biggest mistakes is roasting the squash too long, which turns it mushy and watery. The goal is tender but firm—about 25-30 minutes at 400°F until edges caramelize. I’ve seen people walk away and forget about it, only to return to a sad, soupy mess.
Set a timer and check at 20 minutes—it should yield slightly when pressed but still hold its shape. Overcooked squash makes your filling thin and bland, no matter how good the rest of your technique. 🍠
Skipping the Butter
Some recipes call for oil, but cold unsalted butter is non-negotiable for that rich, velvety texture. I’ve tried shortcuts with margarine or olive oil, and trust me, the flavor and mouthfeel suffer. The butter adds depth to the onions and creates an emulsion with the cream sauce.
Use full-fat butter—low-fat versions won’t give you the same luxurious finish. If you’re watching calories, use half butter and half olive oil, but don’t skip the butter entirely.
Underseasoning the Filling
The filling is where the magic happens, but many cooks hold back on salt and herbs, thinking they’ll add it later. Taste as you go! The squash absorbs flavors, so season it generously with salt and black pepper while roasting and again when combining with the sauce.
Fresh herbs like thyme and sage should be chopped finely and added early—they need time to infuse. I’ve ruined a pie by underseasoning, only to realize too late that the filling was bland. Start with the full amount and adjust—you can’t overdo it, but you can’t fix it later. 🧂
Not Preheating the Oven
A cold oven is a recipe for disaster. Always preheat to 375°F before baking, and let the pie dish sit in the oven for 5 minutes to preheat as well. I’ve seen pies where the crust puffs unevenly or doesn’t brown because the oven wasn’t hot enough.
Use an oven thermometer to confirm your oven’s accuracy—many run 25°F hotter or colder than set. A properly preheated oven ensures even baking and that perfect golden crust.
Overworking the Pastry
Puff pastry is delicate, and overhandling it makes it tough instead of flaky. Roll it gently on a lightly floured surface, and avoid pressing down too hard. I’ve seen people roll it out too thin, which can cause it to tear or burn.
Keep it 1/8-inch thick and handle it as little as possible. If it cracks, patch it with extra dough or a small piece of puff pastry—just don’t stress. The key is confidence; the less you fuss, the better it’ll rise. 🥧
Ignoring the Resting Time
Cutting into the pie too soon is a cardinal sin. The filling continues to cook as the pie rests, and slicing early causes the juices to spill out, leaving you with a dry, sad center.
Let it cool for at least 10 minutes—this also lets the crust set and crisp up. I’ve rushed this step and regretted it every time. If you’re serving guests, cover it loosely with foil to keep the crust warm while it rests.
Patience here makes all the difference in texture and presentation.
Nutrition facts
Frequently asked questions
Can I use a different type of squash in this recipe?
Butternut is ideal for its sweetness, but acorn or delicata squash work beautifully too. For acorn, remove the seeds first. Delicata's skin is edible, so you can skip peeling. Just adjust cooking time—acorn needs about 20 minutes while delicata cooks faster at 15 minutes due to its thinner skin.
How do I make this recipe vegetarian? Swap the chicken broth for vegetable broth and add 1 cup cooked white beans or mushrooms to the filling for protein. For extra richness, use coconut cream instead of heavy cream. The flavors will still shine without meat—just
Can I make this ahead of time?
Yes! Assemble the pie completely (without baking) and refrigerate for up to 24 hours. Bake straight from the fridge, adding 5-10 minutes to the baking time. For freezing, bake the pie first, then cool completely. Wrap tightly in plastic wrap and foil, and freeze for up to 3 months. Reheat at 350°F for 20 minutes to restore crispiness.
What's the best way to reheat leftovers?
Slice the pie and reheat portions in a 350°F oven for 15-20 minutes until warm through. For microwave reheating, cover with a damp paper towel and heat in 30-second intervals until hot. The crust won't be as crispy, but the filling stays delicious. Store leftovers in the fridge for 4-5 days or freeze for 3 months.
Can I substitute puff pastry with regular pie crust?
You can, but the texture will be different. Regular pie crust won't puff, so it'll be flatter and less tender. For best results, use a double crust (top and bottom) and brush with egg wash. If you want flakiness, try phyllo dough instead—it layers beautifully and cooks faster at 350°F for 25 minutes.