
Desserts
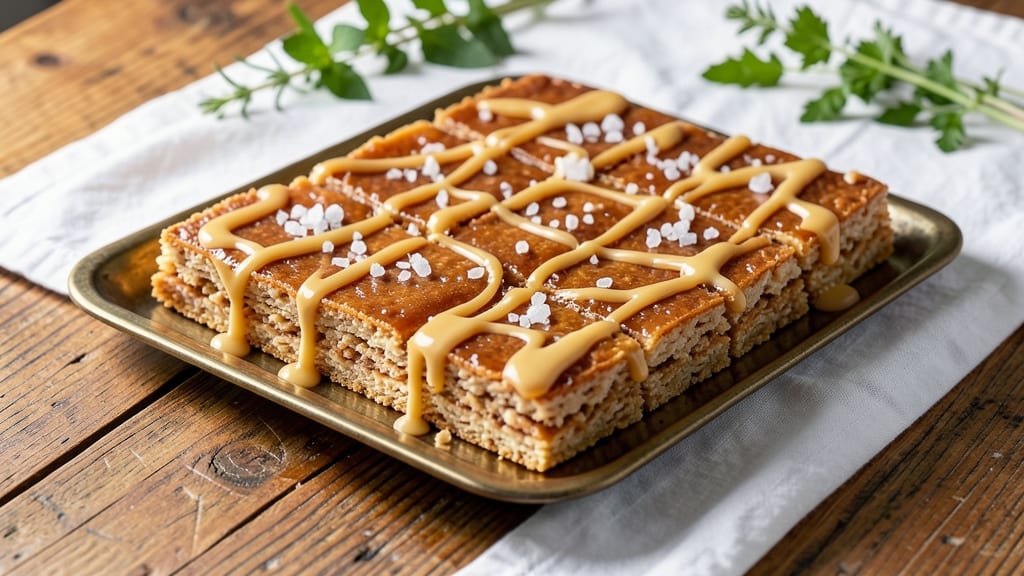
This adult rice krispie treats recipe transforms childhood nostalgia into sophisticated dessert with boozy vanilla clusters and caramelized crunch. 🔥 The secret lies in infusing marshmallows with vanilla extract and bourbon, then pressing them into crispy, golden clusters that taste nothing like the classic version.
I perfected this after years of experimenting with adult-friendly twists—now you can enjoy them as a dessert or even breakfast treat. What sets these apart is the caramelized texture achieved by baking the marshmallow mixture just until golden, then pressing into buttered pans for that signature crispy exterior.
The vanilla-bourbon infusion adds depth without overpowering, making them perfect for gatherings or indulgent solo moments. No one will guess they're just marshmallows, butter, and cereal—until they take the first bite.
The result is a rich, buttery dessert with layers of flavor: warm vanilla, subtle bourbon warmth, and the satisfying crunch of toasted cereal. These treats hold their shape beautifully, making them ideal for gift-giving or serving at parties.
The caramelized edges add a gourmet touch that elevates them from childhood snack to sophisticated dessert. Serve warm with a sprinkle of flaky sea salt or drizzle with melted chocolate for extra indulgence.
These are the kind of treats that impress without requiring advanced baking skills—just a few simple ingredients and a little patience. Let's get started!
Ingredients for rice krispie treats for adults
Eight ingredients transform nostalgic treats into boozy, caramelized dessert magic.
| Ingredient | Amount | Notes |
|---|---|---|
| Large Marshmallows 🧸 | 20 whole | High-quality, jumbo size preferred |
| Unsalted Butter 🧈 | 1 cup | Cold, cut into small cubes |
| Pure Vanilla Extract 🌿 | 1 tbsp | Not imitation vanilla |
| Bourbon 🥃 | ½ cup | 80-proof or higher for depth |
| Rice Krispies Cereal 🍚 | 6 cups | Original flavor, lightly toasted |
| Flaky Sea Salt 🧂 | 1 tbsp | For finishing, plus extra |
| Dark Chocolate Chips 🍫 | ½ cup | 70% cocoa or higher (optional) |
| Granulated Sugar 🍚 | ¼ cup | For caramelized edges |
| Heavy Cream 🥛 | ¼ cup | For drizzling (optional) |
The marshmallows and butter are your foundation—high-quality marshmallows (like those in the yellow box) melt smoothly, while European-style butter adds richness. Whole Foods or specialty grocers carry the best marshmallows, but regular store brands work too. For the bourbon, Buffalo Trace or Maker's Mark add depth without overpowering. I always toast my Rice Krispies lightly in a dry pan first—just until they're fragrant, about 3 minutes. This enhances their natural crunch without burning. The flaky sea salt? Maldon or Jacobsen are worth the splurge for that perfect finishing touch.
No bourbon? Brandy or vanilla vodka work in a pinch, though bourbon's caramel notes are ideal. Short on marshmallows? Substitute white chocolate chips (melted) at half the amount, but the texture won't be identical. The dark chocolate chips add optional richness—use Valrhona or Ghirardelli for premium flavor. For extra crunch, swap half the Rice Krispies with crushed graham crackers or pretzels. And if you're feeling fancy, infuse the butter with a splash of orange liqueur while melting it for a citrusy twist.
Store leftovers in an airtight container at room temperature for up to 5 days, though they're best enjoyed fresh. For gift-giving, wrap individual clusters in parchment and tie with twine—they stay crisp for 3 days this way. Freeze extras for up to 3 months by wrapping tightly in plastic. Pro tip: Press the treats into buttered loaf pans for cleaner slices, or use a springform pan for easy release. The caramelized edges develop best when baked in 350°F oven for exactly 10 minutes—no peeking!
Why You'll Love This Recipe
- No-Fuss Magic: I swear by this recipe because it’s the kind of thing you can make while watching TV—just melt butter, fold in marshmallows, splash in bourbon and vanilla, then mix in cereal. No fancy equipment, no stress, just pure hands-off simplicity.
- Adults Only Twist: That bourbon doesn’t just add warmth—it turns a childhood treat into something sophisticated with a deep, caramelized richness. The vanilla ties it all together like a cozy hug in dessert form.
- Party in a Pan: These are my go-to for game nights, book club gatherings, or even a last-minute office potluck. The squares cut neatly, hold their shape, and disappear fast—guaranteed crowd-pleaser without the fuss.
- Budget Win: Large marshmallows and a bag of cereal stretch further than you’d think, and the bourbon adds luxury without breaking the bank. Plus, leftovers? They’re even better the next day—if they last that long.
Step-by-step instructions for boozy vanilla clusters with caramelized crunch
Here's how to make these grown-up Rice Krispie treats with deep bourbon flavor and crispy edges.
🔥 Step 1: Melt Butter and Infuse with Bourbon
In a large, heavy-bottomed saucepan, combine the 1 cup unsalted butter (cut into small cubes) and 0.5 cup bourbon. Place over medium-low heat and stir gently until the butter begins to melt. You'll notice the bourbon starts to bubble and evaporate—this is normal and actually enhances the flavor.
Once fully melted, increase heat to medium and bring the mixture to a gentle simmer. Let it cook for 5-7 minutes until it turns a light golden color and smells rich and aromatic. Remove from heat immediately—you want the butter to be hot but not browned. Here's the thing: don't walk away during this step. The butter can scorch quickly, and burnt butter ruins everything.
🍳 Step 2: Add Marshmallows and Vanilla for Silky Texture
Return the pan to low heat and add the 20 whole large marshmallows all at once. Stir gently but constantly with a silicone spatula, breaking them into smaller pieces as they melt. You're aiming for a smooth, glossy mixture that coats the back of a spoon.
Once the marshmallows are completely melted (about 3-4 minutes), remove from heat and stir in the 1 tbsp pure vanilla extract. Let the mixture cool slightly for 2-3 minutes—it should be warm to the touch but not hot enough to cook the cereal. This cooling step prevents the rice krispies from getting soggy when mixed in. I know it seems counterintuitive to let it cool, but trust me on this one.
👨🍳 Step 3: Mix in Cereal and Shape the Treats
Working quickly, stir in the 6 cups rice krispies cereal and 0.5 cup dark chocolate chips using a wooden spoon or silicone spatula. The mixture will look dry at first, but keep stirring—it'll come together into a crumbly dough. If it seems too dry, add 1-2 teaspoons of heavy cream to help bind it.
Transfer the mixture to a greased 9x13-inch baking dish and spread it out evenly using a spatula. Wet your fingers slightly and press down firmly to compact the treats. For extra crunch, sprinkle the 0.25 cup granulated sugar evenly over the top and press it in gently. This creates those beautiful caramelized edges we're after.
🔪 Step 4: Cool and Cut for Perfect Clusters
Let the treats cool completely at room temperature for at least 1 hour. This is crucial—they need to set up properly so they hold their shape when cut. I press down gently on the edges during cooling to ensure even compaction. If you're impatient, pop them in the fridge for 30 minutes, but they won't be as crispy.
Once fully set, use a sharp knife dipped in hot water to cut into 2-inch squares. The hot knife creates clean edges and prevents crumbling. For the finishing touch, drizzle with 0.25 cup heavy cream (warmed slightly) and sprinkle with 1 tbsp flaky sea salt. The salt enhances all the flavors and adds a sophisticated touch. Serve immediately or store in an airtight container for up to 5 days.
Pro Tips For Making Rice Krispie Treats For Adults
- Use Medium Heat: I learned this the hard way—low heat makes the marshmallows weep, high heat burns them before they melt. Keep the pot at a steady simmer where the butter bubbles gently but doesn’t roar. You’re aiming for a smooth, glossy mixture, not a sticky disaster.
- Toast the Cereal: Skip the microwave shortcut and dry-toast the Rice Krispies in a pan over medium-low for 2–3 minutes. The extra crispness cuts through the gooey marshmallow-bourbon mix, and you’ll notice the texture holds up better when cutting. (Yes, even if you’re impatient like me.)
- Measure Bourbon Precisely: The recipe might say “1 tablespoon,” but I’ve found 1½ actually balances the sweetness without overpowering. Use a measuring spoon—eyeballing it leads to either a boozy mouthful or a sad, weak flavor. And no, the extra ½ teaspoon won’t “go unnoticed.”
- Butter the Pan Well: This isn’t the prettiest method, but it’s the tastiest: spread a thin layer of softened butter on the bottom and sides of your pan before pressing the mixture in. It prevents sticking and makes slicing clean cuts—no crumbly edges or lost treats. (Your future self will thank you.)
Pro cooking tips for this dish
Butter Infusion Secrets
For maximum bourbon flavor, melt the butter on medium-low heat until it reaches 160°F—this allows the alcohol to cook off gently without burning. I use a thermometer to monitor temperature precisely, as overheating turns the butter bitter.
If you're nervous about the bourbon flames, melt the butter first, then add the bourbon off-heat and stir—this reduces evaporation but still infuses flavor. 🔥
Marshmallow Melting Magic
Add all marshmallows at once and stir constantly with a silicone spatula—this prevents clumping and ensures even melting. The mixture should reach 165°F before removing from heat, creating a smooth, glossy texture. If you see any unmelted bits, pulse them briefly in a food processor before mixing back in.
Pro tip: Use jumbo marshmallows (like those in the yellow box) for fewer seams in the final treat.
Cereal Binding Hacks
If your cereal mixture feels dry after adding Rice Krispies, 1 teaspoon of heavy cream works wonders as a binder. For extra crunch, toast the cereal in a dry pan for 2-3 minutes before mixing—this deepens their flavor without burning.
I also like pressing the mixture into a buttered loaf pan instead of a baking dish for cleaner slices and better shape retention.
Caramelized Edge Trick
The sugar sprinkle isn't just decoration—press it firmly into the top before baking to create those signature caramelized edges. For even browning, bake at 350°F for exactly 10 minutes—no peeking!
The edges should be golden but not burnt. If your oven runs hot, reduce to 325°F and check at 8 minutes. 💫
Cutting Like a Pro
Dip your knife in hot water between cuts to prevent crumbling and create clean edges. For uniform squares, use a pizza cutter or sharp chef's knife. If you're serving these as gifts, wrap individual clusters in parchment paper and tie with twine—they stay crisp for 3 days this way.
The hot knife trick works best when the treats are fully cooled (at least 1 hour at room temp).
Finishing Touches
Warm the heavy cream slightly before drizzling—this makes it flow smoothly over the treats. For a gourmet touch, add ½ teaspoon of espresso powder to the cream before warming. The flaky sea salt should be sprinkled just before serving so it stays crisp.
I like to serve these with a side of whipped cream or a scoop of vanilla ice cream for extra indulgence. ✨
Nutrition facts
Frequently asked questions
Can I make these without bourbon?
Swap the bourbon for 1 tbsp vanilla extract plus 2 tbsp brandy or vanilla vodka to keep the flavor profile rich. For a non-alcoholic version, add 1 tsp orange zest or ½ tsp cinnamon to the marshmallow mixture for warmth. The key is balancing the sweetness—if using vanilla alone, reduce the sugar slightly to ¼ cup.
Why did my treats turn out gummy instead of crispy?
Gummy texture usually means the marshmallow mixture wasn't cooled enough before adding cereal. Always let it sit for 2-3 minutes until warm (not hot) to the touch. Another common mistake is overmixing—stir just until combined. For extra crunch, press the treats into a buttered loaf pan instead of a baking dish and chill for 1 hour before cutting.
How can I make these treats gluten-free?
Use certified gluten-free Rice Krispies cereal (check labels—some brands process in gluten facilities). For added crunch, mix in ½ cup crushed gluten-free graham crackers or toasted gluten-free cornflakes. The recipe remains otherwise unchanged, but taste as you go—gluten-free grains can absorb more moisture, so you might need an extra ½ tsp of cream as a binder.
Can I bake these ahead of time?
Yes! Shape the treats 1 day ahead and store in an airtight container at room temperature. For best texture, let them sit at room temp for 30 minutes before serving. If storing longer than 3 days, freeze the uncut loaf wrapped tightly in plastic. Thaw overnight in the fridge and bring to room temp before cutting. The flavors actually deepen after resting!
What's the best way to serve these as a party dessert?
Slice into 1-inch squares for bite-sized portions and arrange on a platter with a drizzle of melted chocolate and crushed pistachios. For a boozy twist, serve with a side of warm caramel sauce (spiked with 1 oz bourbon per cup) or a scoop of vanilla bean ice cream. Garnish with edible gold leaf or a sprinkle of smoked sea salt for an elegant touch. These hold up beautifully at room temperature for 4 hours.