
Salads
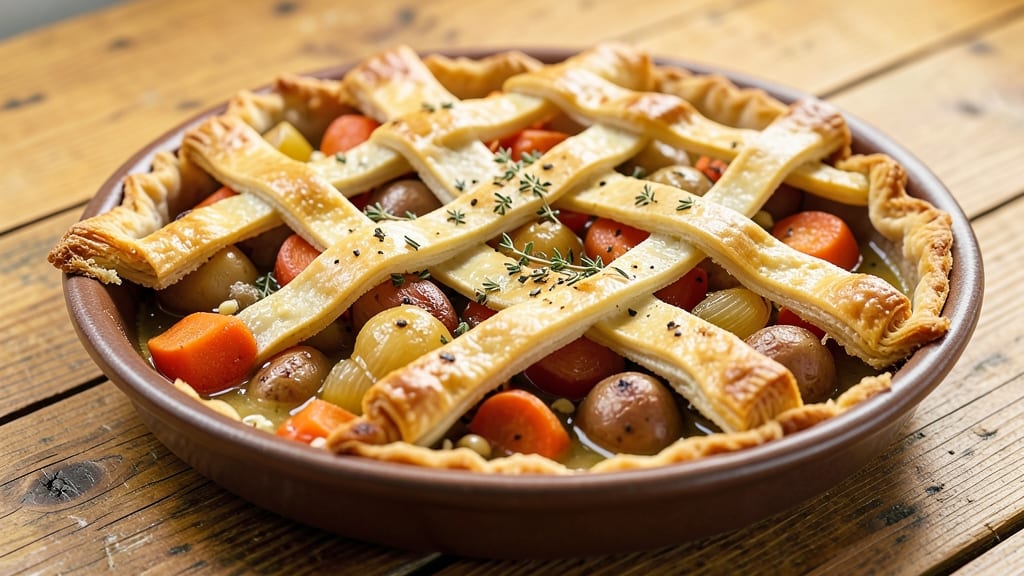
This root vegetable pot pie recipe delivers comfort food perfection with a golden, flaky crust and hearty filling packed with carrots, parsnips, and potatoes. The secret lies in a rich herb-infused gravy that binds the vegetables together while keeping them tender, not mushy.
I developed this recipe after years of perfecting the balance between crispy crust and creamy filling—no one will guess it's a healthier twist on classic pot pie.
The foundation starts with a flaky homemade crust (or store-bought if short on time) that bakes to a golden brown, while the filling simmers until the vegetables are fork-tender.
A blend of fresh thyme, rosemary, and garlic transforms the gravy from ordinary to extraordinary, adding depth without overpowering the natural sweetness of the roots. The key is patience—letting the vegetables cook low and slow ensures they absorb all that flavor.
What you'll end up with is a pot pie that looks impressive but requires minimal effort: a lattice crust that's both decorative and functional, a filling so flavorful it disappears quickly, and a gravy that's rich enough to satisfy even gravy skeptics.
The aroma alone will have everyone gathering at the table, and the first bite delivers that perfect mix of textures—crispy crust, creamy gravy, and tender vegetables.
Serve with a simple green salad for balance or extra crust pieces on the side for dipping. This recipe scales beautifully for gatherings, and leftovers reheat perfectly. Here's how to make it—step by step.
Ingredients for root vegetable pot pie
Six hearty vegetables and a flaky crust—this pot pie delivers restaurant-quality comfort with minimal effort.
| Ingredient | Amount | Notes |
|---|---|---|
| Carrots 🥕 | 3 lb | Medium, peeled and sliced into 1/2-inch rounds |
| Parsnips 🥕 | 2 lb | Peeled and cut into 1/2-inch chunks |
| Russet Potatoes 🥔 | 3 lb | Peeled and cut into 1-inch cubes |
| Yellow Onion 🧅 | 1 whole | Diced into 1/4-inch pieces |
| Garlic Cloves 🧄 | 4 cloves | Minced for depth of flavor |
| Fresh Thyme 🌿 | 2 tbsp | Leaves only, finely chopped |
| Fresh Rosemary 🌿 | 1 tbsp | Needles finely chopped |
| Chicken Stock 💧 | 3 cups | Homemade or high-quality store-bought |
| Heavy Cream 🥛 | 1 cup | Full-fat for optimal richness |
| All-Purpose Flour 🌾 | 3 cups | For both filling and crust |
| Cold Unsalted Butter 🧈 | 1 cup | Cubed, for flaky crust |
| Ice Water 💧 | ½ cup | For dough elasticity |
| Diamond Crystal Kosher Salt 🧂 | 1 ½ tsp | Divided for filling and crust |
| Ground Black Pepper 🌶️ | ½ tsp | Freshly ground for brightness |
| All-Purpose Flour (for dusting) 🌾 | ¼ cup | Prevents sticking during assembly |
The vegetables are the soul of this dish, so prioritize freshness and even cutting. Local farmers markets often have the best parsnips and carrots—look for vibrant color and firm texture. Potatoes should be starchy (like Russets) to hold their shape without turning mushy. If using store-bought, Organic Valley or local brands ensure consistent quality. For the herbs, fresh is non-negotiable—dried thyme and rosemary lack the aromatic complexity needed to elevate the gravy. Whole Foods or Trader Joe's carry reliable herb bundles, but always check for wilting stems. Prep all vegetables uniformly to ensure even cooking—this is where the magic happens in pot pies.
No fresh thyme? Dried works at one-third the amount, but the flavor won't be as bright. Running short on parsnips? Swap in turnips or celery root for similar texture. The chicken stock can be substituted with vegetable stock for a vegetarian version, though the depth of flavor will differ slightly. For the crust, store-bought pie crusts like Pepperidge Farm save time, but homemade delivers that signature flakiness. If you're short on butter, vegetable shortening in equal parts maintains structure. The key to the lattice crust is keeping everything chilled—don't skip the ice water in the dough. It's worth the extra minute to cut the dough strips precisely for that professional look.
Assembled pot pies keep for 3 days in the fridge, but they're best enjoyed within 24 hours for peak crust crispness. Freeze unbaked pies for up to 3 months—thaw overnight in the fridge before baking. To reheat, cover with foil and bake at 375°F for 20 minutes to restore crispiness. The filling reheats beautifully, though the crust may soften slightly. For make-ahead convenience, prep the filling and crust separately, then assemble just before baking. This recipe scales perfectly for gatherings—simply double the filling and crust components while maintaining the same ratios.
Why You'll Love This Recipe
- Here’s what sold me: the parsnips add this natural sweetness that caramelizes as they cook, while the garlic and onion bring that deep, savory punch. It’s not just "veggie flavor"—it’s ridiculously good in a way that makes you forget it’s basically a bowl of roots.
- I’ll be real: this recipe costs me about $8 for a full pot pie, and it feeds four. Potatoes and carrots stretch forever, and parsnips? They’re the unsung hero of cheap, filling ingredients. Plus, it’s the kind of dish that makes you feel like you’re eating fancy without breaking the bank.
Step-by-step instructions for root vegetable pot pie
Master the art of creating a golden, flaky crust over tender root vegetables in this foolproof method.
Prepare and Parboil the Root Vegetables
Start by peeling and cutting the 3 lb carrots into ½-inch rounds and the 2 lb parsnips into ½-inch chunks. For the 3 lb russet potatoes, peel and cut into 1-inch cubes. This uniform size ensures even cooking throughout the pot pie.
In a large pot, combine the vegetables with the 1 whole yellow onion (diced into ¼-inch pieces), the 4 cloves garlic cloves (minced), ½ tsp Diamond Crystal kosher salt, and ¼ tsp ground black pepper. Cover with cold water by about 1 inch and bring to a boil over high heat. Once boiling, reduce to a simmer and cook for 8-10 minutes until the vegetables are just tender but still hold their shape. Drain well in a colander and return them to the pot.
Sauté the Vegetables and Build the Filling
Heat a large skillet over medium heat and add the parboiled vegetables along with the 2 tbsp fresh thyme and 1 tbsp fresh rosemary. Sauté for 5-6 minutes, stirring occasionally, until the vegetables begin to caramelize slightly and release their natural sweetness. This step deepens their flavor and ensures a rich, aromatic filling.
In a separate bowl, whisk together 3 cups all-purpose flour, the remaining 1 tsp Diamond Crystal kosher salt, and the ¼ tsp ground black pepper. Gradually whisk in the 3 cups chicken stock and 1 cup heavy cream until smooth. Pour this mixture over the sautéed vegetables and stir well. The filling should be thick but still pourable. Return the mixture to the skillet and simmer over medium-low heat for 5-7 minutes, stirring frequently, until the sauce thickens to a velvety consistency.
Prepare the Flaky Crust Dough
In a large mixing bowl, combine the 3 cups all-purpose flour (for crust) with the 1.5 tsp Diamond Crystal kosher salt (remaining amount). Cut in the 1 cup cold unsalted butter using a pastry cutter or your fingers until the mixture resembles coarse crumbs with pea-sized butter pieces. This texture is crucial for achieving a flaky crust.
Drizzle in the ½ cup ice water while stirring with a fork until the dough just comes together. Avoid overmixing—just combine until the dough forms a shaggy mass. Turn the dough onto a lightly floured surface and knead gently for 30-45 seconds until smooth. Wrap the dough in plastic wrap and refrigerate for at least 30 minutes to firm up. This resting period relaxes the gluten, making it easier to roll out later.
Assemble and Bake the Pot Pie
Preheat your oven to 375°F. Lightly grease a 9x13-inch baking dish and dust the bottom with ¼ cup all-purpose flour (for dusting) to prevent sticking. Spread the vegetable filling evenly into the prepared dish, mounding it slightly in the center.
Roll out the chilled dough on a lightly floured surface to a ⅛-inch thickness. Cut the dough to fit the top of the baking dish, leaving a ½-inch overhang on all sides. Drape the dough over the filling, trim the excess, and crimp the edges using a fork or your fingers to seal tightly. Cut 4-5 small slits in the center of the dough to allow steam to escape.
Place the assembled pot pie on a baking sheet lined with parchment paper to catch any drips. Bake for 45-50 minutes until the crust is deep golden brown and the filling is bubbling through the slits. For extra browning, broil for 1-2 minutes at the end, keeping a close eye to prevent burning.
Rest and Serve for Maximum Flakiness
Remove the pot pie from the oven and let it rest for 10-15 minutes before serving. This resting period allows the filling to set slightly, making it easier to slice without spilling. The crust will firm up and become even more flaky as it cools.
Slice into 6 equal servings and serve warm, ensuring each portion includes both the tender filling and the crisp, golden crust. The combination of caramelized root vegetables, herb-infused gravy, and buttery crust creates a harmonious balance of textures and flavors in every bite.
Pro Tips For Making Root Vegetable Pot Pie
- PARBOIL POTATOES FIRST: I learned this the hard way—skipping the parboil means your potatoes turn to mush while the carrots and parsnips stay tough. Toss peeled russets into boiling water for 5 minutes, then drain and shock in ice water. This keeps them creamy and intact when they bake later.
- CUT EVENLY, COOK UNIFORMLY: Uneven pieces mean some roots get mushy while others stay raw. Aim for 1-inch chunks—carrots and parsnips hold up better than potatoes, so slice them slightly smaller. (Yes, even if it looks like a puzzle.)
- DON’T SKIP THE ONION BASE: Sautéing onion and garlic until deeply golden (not just soft) builds flavor that cuts through the earthiness of the roots. Let it cook low and slow—rushing this step makes the whole pie taste bland. (I know, I know, but trust the process.)
- USE COLD FILLING FOR CRISP TOPPING: Chilling the root veggie mix for 30 minutes before adding the crust keeps it from steaming and turning soggy. Spread it in the dish, then refrigerate—this guarantees a golden, flaky top instead of a sad, limp one. (Your future self will thank you.)
Common mistakes when making great root vegetable pot pie
Overcooking Vegetables
Root vegetables like carrots and parsnips can turn mushy if cooked too long, especially after the initial parboil. I’ve ruined countless pot pies by letting them simmer too long in the filling—aim for just until tender but still firm to the touch (about 5-7 minutes after adding the sauce).
Overcooked vegetables release excess moisture, making the filling watery and the crust soggy. Always taste-test a small piece before assembling the pie. 🥕
Skipping the Parboil
Skipping the 8-10 minute parboil step is a common mistake that leads to uneven cooking. Raw root vegetables release starches that can make the filling gummy instead of creamy.
The parboil also helps the vegetables absorb the herb-infused gravy evenly. If you’re short on time, steam them for 5 minutes instead—just don’t skip this step entirely.
Underseasoning the Filling
The herb-infused gravy is the soul of this pot pie, so don’t hold back on flavor. I’ve seen home cooks use half the recommended thyme or rosemary, resulting in a bland filling. Fresh herbs are non-negotiable—dried substitutes won’t deliver the same aromatic punch.
Taste the filling before baking and adjust with salt, pepper, or a splash of lemon juice if needed. The gravy should be rich but not overpowering.
Poor Crust Handling
A flaky crust starts with cold butter and ice water—never skip the 30-minute chill before rolling. I’ve seen dough turn gummy and difficult to handle when rushed. Keep everything chilled while working, and avoid over-handling the dough.
If the crust puffs up unevenly in the oven, it’s likely because the dough wasn’t cold enough. For extra insurance, blind-bake the crust for 10 minutes before adding the filling if you’re worried about sogginess.
Uneven Filling Distribution
An uneven filling leads to a lopsided pie that’s hard to slice and serve. Mound the filling slightly in the center of the dish to create a dome shape—this helps the crust lay flat and prevents air pockets.
Press down gently with a spoon to smooth the top before adding the crust. If the filling is too thick to spread easily, warm it slightly to loosen the sauce. A well-distributed filling ensures even baking and a professional-looking result. 🍽️
Overbaking for Color
Watch that crust like a hawk—golden brown is perfect, not blackened. I’ve burned more pot pie crusts than I’d like to admit by leaving them in the oven too long or broiling without supervision. The filling should be bubbling through the slits when done, not boiling over.
If the crust isn’t brown enough after 45-50 minutes, broil for just 1-2 minutes—no more! A well-timed rest after baking (even 10 minutes) helps the crust crisp up further without risking overcooking.
Nutrition facts
Frequently asked questions
Can I use frozen root vegetables instead of fresh?
Fresh root vegetables work best for texture, but frozen will do in a pinch! Just thaw and drain them completely before parboiling to avoid excess moisture in your filling. For best results, use frozen vegetables labeled "cut and ready to cook" (like parsnips or carrots) and add 1 extra minute to the parboiling time.
How can I make this vegetarian?
Swap the chicken stock for vegetable stock and add 1 cup cooked lentils or mushrooms to the filling for protein and texture. You can also boost umami with 1 tbsp soy sauce or nutritional yeast in the gravy. The flavor will be slightly different but still delicious!
Why did my crust turn out soggy?
Soggy crusts usually mean the filling was too wet or the crust wasn't baked long enough. Try blind-baking the crust for 10 minutes before adding filling, or reduce the heavy cream in the filling by 2 tablespoons. Also ensure your oven is fully preheated to 375°F.
Can I make this ahead of time?
Assemble the pie (unbaked) and refrigerate for up to 24 hours before baking. For longer storage, freeze the assembled pie (unbaked) for up to 3 months. Thaw overnight in the fridge before baking. Leftovers reheat beautifully at 350°F for 15 minutes with foil covering.
What's the best way to reheat leftovers?
For maximum crispiness, cover with foil and reheat at 350°F for 15 minutes, then uncover and broil for 2 minutes to restore crust texture. If using a microwave, cover with a damp paper towel and heat in 30-second intervals—this prevents the crust from getting rubbery.